Product Schema In Search Results – What Is It?
There are essentially two different kinds of product schema that we can see. What they do is expand the amount of space you consume in the search results (more real estate, it’s a great thing!) and display your products name, price (or price range), and condition. Here are two examples of how this can be displayed, one with aggregate review ratings, and one without.
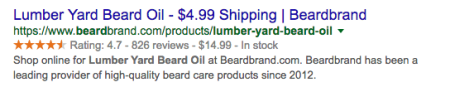
This is product schema being used with reviews to display star ratings.

This is product schema without the reviews being displayed, and also with the condition being shown.
What I’m going to walk you through here, is how to make the second results work for your store. This is ideal if you don’t have product reviews to display because you’re just starting out, or maybe you haven’t been using a service to collect the reviews. In Shopify, there isn’t an easy way to manually generate these results on a per-product basis, so I would definitely recommend shying away from that.
If you want to have the star ratings appear, check out my other post on How To Add Star Ratings To Your Shopify Store Search Results, and check out the service YotPo.
I have great news! You do not need to have a developer do any work to get these changes, unless of you want to share this article with your developer then that’ll work too!
Step 1 – Copy the code below
[code]
<script type=’application/ld+json’>
{
“@context”: “http://schema.org/”,
“@type”: “Product”,
“name”: “{{ product.title }}”,
“url”: “{{ shop.url }}{{ product.url }}”,
“image”: “{{ shop.url }}{{ product.featured_image }}”,
“description”: “{{ page_description }}”,
“offers”: {
“@type”: “Offer”,
“priceCurrency”: “{{ shop.currency }}”,
“price”: “{{ product.price | money_without_currency }}”,
“itemCondition”: “http://schema.org/NewCondition”,
“availability”: “http://schema.org/InStock”
}
}
</script>
[/code]
Step 2 – Log into your shopify store’s admin section
You’ll need to be logged in as an admin or as a user with the ability to make edits to your theme. If you’re the store owner, you’ll have no problem with this.
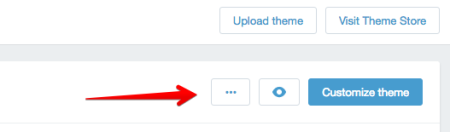
Once logged into the store, on the left hand side click on “Online Store”, then “Themes”, then you’ll want to click on the three dots on the top right hand side, and select “Edit HTML/CSS”. The image below has a red arrow pointing at what I’m referring to here.
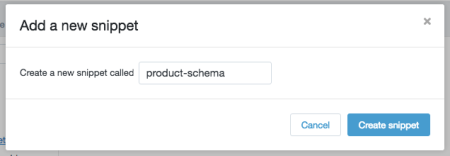
Now, on the left side you’ll see a list of files. Scroll down to the folder icon that says “Snippets” next to it and click on it to expand the list. Then right below where you just clicked you’ll see the option “Add a new snippet”, click on that. In the window that pops up, type in “product-schema” without the quotations. See the example image below, and then hit “Create Snippet”.
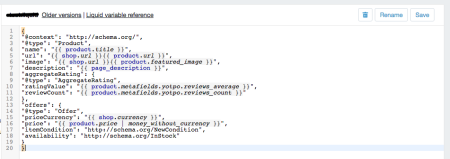
A blank space should now open up in front of you. Go ahead and paste the code you copied from above. I prefer keyboard shortcuts, so hit (Command + V) if you’re on a Mac like me, or (Control + C) if you’re on a Windows/Linux machine to paste the code. You should now have what looks like the example below. If you do, go ahead and hit save!
Step 3 – Adding the product schema to all of the product pages
Now the next step is to add the code to the products template. Shopify is great because we do this once, and it’ll be on every product page instantly! Woohoo! And it’ll be dynamic, so every time you add a product this will be included, and it’ll automatically adjust to reviews, pricing changes, in stock or out of stock availability as well. On the left hand side, click on the folder that has “Templates” next to it. Next, scroll through the list and look for “product.liquid”. This is Shopify’s template that handles every product page, so once you see it click on it and the code should be displayed. Now, copy the code below.
[code]
{% include ‘product-schema’ %}
[/code]
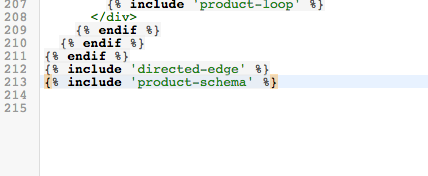
You can paste this code into 2 places in your theme that will include the code and will not change any of the design on your site. You can make this code the very first line, or the very last line, of the file. I did an example image below that shows the code being added as the very last line in the product template file, this way you know what it should look like. If you don’t have any extra lines at the end of the file, don’t be afraid to hit “Enter” and make a few lines to add this code into. Once you’ve done this, hit save!
Step 4 – Testing the code to make sure it’s populating correctly.
To make sure the code is put into place perfectly, we can do a simple test using Google’s Structured Data Testing Tool. For this test, you’ll want to go to your live site and grab a URL to work with, specifically a link to a product page is what we want. Copy the URL in your browser and open up Google’s Structured Data Testing Tool. paste the URL into the left hand side that says “Fetch URL”, specifically right onto where that writing is. Then click “Fetch & Validate”. Below is an example of what it looks like once you’ve successfully added in the code above.
![]() Success! We don’t see any errors listed, so this means we are good to go.
Success! We don’t see any errors listed, so this means we are good to go.
That’s it! If you’ve gotten to this point, you’re all done. All you have to do now is continue your SEO efforts in order to maximize the benefits of you’re product schema.
Ian
February 12, 2017 at 9:14 am
AWESOME!!! I was looking for this code snippets for hours!
THANK YOU!!!
Installed and running:
https://www.eravape.com/collections/brown-bag-vape/products/brown-bag-vape-long-leaf
Works like magic!
Seth Tucker
February 13, 2017 at 2:49 pm
Looks good Ian!
Cindy Noel
May 15, 2018 at 9:12 pm
The info I received was helpful. Thanks!
Scott
August 12, 2018 at 10:40 pm
Hi does this still work in 2018? Thanks
Kaspars Brencans
August 13, 2018 at 1:50 pm
Hey Scott,
Yes – it still works in 2018!