Yotpo aggregate review ratings – what are they?
When people purchase a product from your store on Shopify, a service called Yotpo let’s buyers leave authentic reviews about your product on your site. New visitors can view the reviews, and it adds a lot of credibility to your site when you have the ratings and reviews on your site. But what if you could show them how awesome your product is before they ever got onto your site? I’ll show you how to easily add Yotpo aggregate review ratings to your product schema in 4 simple steps! You do not need to be a developer to make these changes.
See how the star ratings appear, the number of reviews, the price and that the item is in stock? That’s what we want to produce with these steps! This is a great example of what Yotpo aggregate review ratings look like in the search engines. For this example, I did this back in January 2016, when the site did not have any product schema available but they did have a ton of reviews from Yotpo. Their click-through-rate went through the roof and their rankings increased by 3 positions over the following 4 weeks. Not bad results considering it’s free and only takes a few minutes to implement.
Step 1 – Copy the code below
[code]
<script type=’application/ld+json’>
{
“@context”: “http://schema.org/”,
“@type”: “Product”,
“name”: “{{ product.title }}”,
“url”: “{{ shop.url }}{{ product.url }}”,
“image”: “{{ shop.url }}{{ product.featured_image }}”,
“description”: “{{ page_description }}”,
“aggregateRating”: {
“@type”: “AggregateRating”,
“ratingValue”: “{{ product.metafields.yotpo.reviews_average }}”,
“reviewCount”: “{{ product.metafields.yotpo.reviews_count }}”
},
“offers”: {
“@type”: “Offer”,
“priceCurrency”: “{{ shop.currency }}”,
“price”: “{{ product.price | money_without_currency }}”,
“itemCondition”: “http://schema.org/NewCondition”,
“availability”: “http://schema.org/InStock”
}
}
</script>
[/code]
Step 2 – Log into your shopify store’s admin section
You’ll need to be logged in as an admin or as a user with the ability to make edits to your theme. If you’re the store owner, you’ll have no problem with this.
Once logged into the store, on the left hand side click on “Online Store”, then “Themes”, then you’ll want to click on the three dots on the top right hand side, and select “Edit HTML/CSS”. The image below has a red arrow pointing at what I’m referring to here.
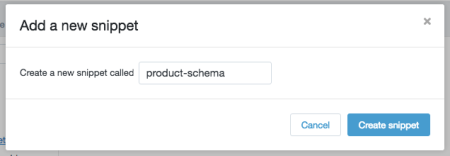
Now, on the left side you’ll see a list of files. Scroll down to the folder icon that says “Snippets” next to it and click on it to expand the list. Then right below where you just clicked you’ll see the option “Add a new snippet”, click on that. In the window that pops up, type in “product-schema” without the quotations. See the example image below, and then hit “Create Snippet”.
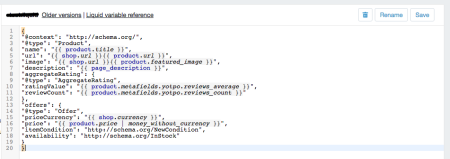
A blank space should now open up in front of you. Go ahead and paste the code you copied from above. I prefer keyboard shortcuts, so hit (Command + V) if you’re on a Mac like me, or (Control + C) if you’re on a Windows/Linux machine to paste the code. You should now have what looks like the example below. If you do, go ahead and hit save!
Step 3 – Adding the product schema to all of the product pages
Now the next step is to add the code to the products template. Shopify is great because we do this once, and it’ll be on every product page instantly! Woohoo! And it’ll be dynamic, so every time you add a product this will be included, and it’ll automatically adjust to reviews, pricing changes, in stock or out of stock availability as well. On the left hand side, click on the folder that has “Templates” next to it. Next, scroll through the list and look for “product.liquid”. This is Shopify’s template that handles every product page, so once you see it click on it and the code should be displayed. Now, copy the code below.
[code]
{% include ‘product-schema’ %}
[/code]
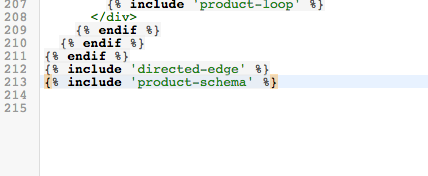
You can paste this code into 2 places in your theme that will include the code and will not change any of the design on your site. You can make this code the very first line, or the very last line, of the file. I did an example image below that shows the code being added as the very last line in the product template file, this way you know what it should look like. If you don’t have any extra lines at the end of the file, don’t be afraid to hit “Enter” and make a few lines to add this code into. Once you’ve done this, hit save!
Step 4 – Testing the code to make sure it’s populating correctly.
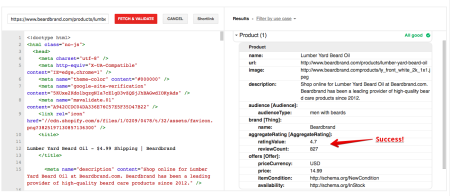
To make sure the code is put into place perfectly, we can do a simple test using Google’s Structured Data Testing Tool. For this test, you’ll want to go to your live site and grab a URL to work with, specifically a link to a product page is what we want. Copy the URL in your browser and open up Google’s Structured Data Testing Tool. paste the URL into the left hand side that says “Fetch URL”, specifically right onto where that writing is. Then click “Fetch & Validate”. Below is an example of what it looks like once you’ve successfully added in the code above.
That’s it! If you’ve gotten to this point, you’re all done. All you have to do now is continue your SEO efforts in order to maximize the benefits of you’re product schema and Yotpo aggregate review ratings!


Du An Can Ho Sapphira
May 17, 2018 at 1:54 am
This post is invaluable. When can I find out more?
Kaspars Brencans
May 21, 2018 at 7:08 am
Du An Can Ho Sapphira,
Could you give us some specifics on what would you like to find out more about?
This is a pretty straight forward DIY guide on how to add YotPo Aggregate Review Ratings, so I’m not sure why would you think it’s invaluable.
can ho sapphira
July 1, 2018 at 12:46 am
This is a great tip particularly to those new to the blogosphere.
Brief but very accurate info… Thanks for sharing this
one. A must read article!
Waleed
May 26, 2023 at 10:30 am
Hi, do you have code to add reviews in the schema for yopto app.
Need to add review schema on shopify website.
Any help would be appreciated.
Thanks.